
Valorant Split Map Guide
Split is one of the seven maps currently featuring in Valorant and was released alongside Haven and Bind at launch. It’s based in Japan, where the character Yoru hails from and has quite tight angles compared to most maps.
Split Map Layout and Callouts
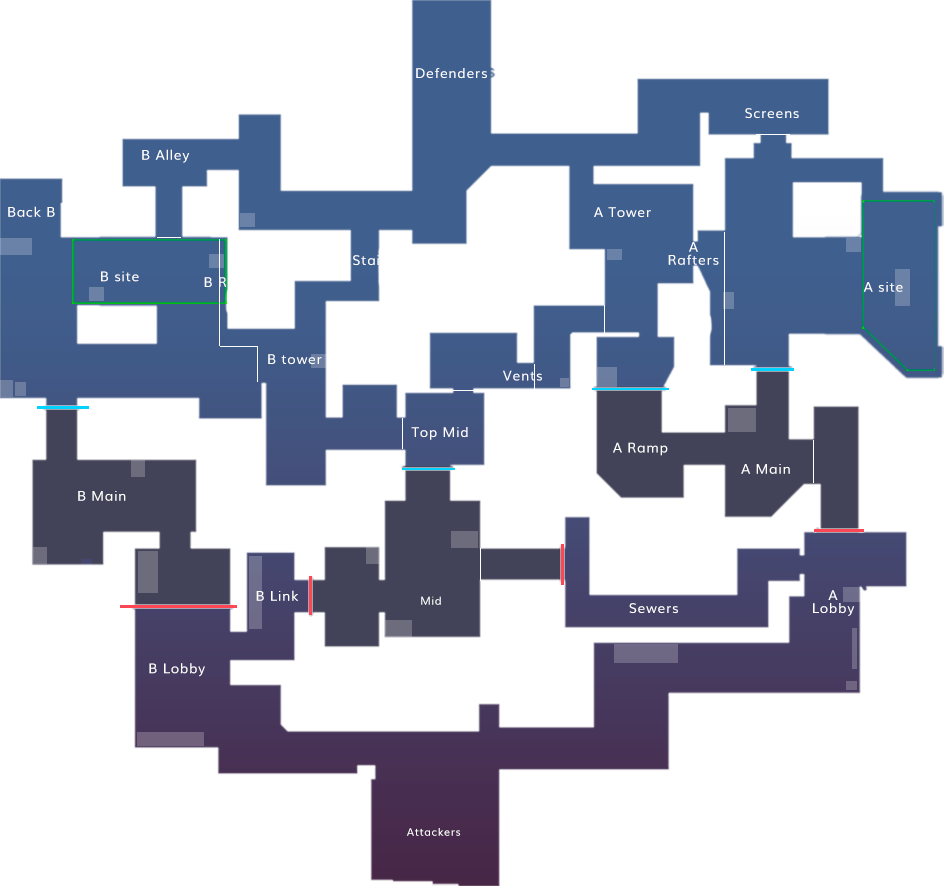
Split has two bomb sites and a middle area with multiple routes of entry. There are also three sets of rope ascenders located in various spots around the map, letting players navigate the map differently.
A Site
The planting area for A Site is quite open, with just a penetrable box in the middle of the area that provides little cover. Outside the planting area, there’s an open section with a long line of sight extending from A Screens to A Main and an upper level known as A Tower that players can access from A Ramps, Mid Vent, and Defender Side Spawn.
A Site can be generally difficult to defend, but there is a choke point in A Main that attackers can often struggle to push through.
B Site
B Site is built around a tall, impenetrable structure that provides cover for both attackers and defenders. There are entry points into the site from B Main, B Alley, and B Tower, and there’s also a tiny cubby (B Back) for players to hide in and hold angles from.
Mid
Mid on Split has four points of entry and has a bunch of cubbies located in and around the area, making it dangerous to navigate through at any point during a round.
Special Feature – Ascendable Ropes
On Split, the three sets of ascendable ropes are located in the following places:
- Mid Vent
- B Tower/B Hell
- A Sewer/A Lobby
Ropes typically make noise when used, but if you hold shift, you’ll be able to use them silently and not give away your location.
General Tips
Next, we’ve got some general tips for playing on Split:
- Take advantage of audio cues. Split has a lot of audio cues that will help you figure out where your enemies are, so make sure you listen out for them. Examples include the sound of players dropping from Rafters to Site; the unique footstep sound players make when running through A Sewer, and the sound players make when using ropes.
- Check your corners. Split has a lot of cubbies and tight angles, so it’s important that you always check your corners thoroughly when navigating the map. You don’t want to get caught out by an enemy!
Now, let’s move on to talking about the best ways to attack and defend the two sites.
Attacking A Site
There are a few different options when attacking A site, but you’ll generally want to smoke off A Screens and push up through A Ramps to secure A Tower. Then you can drop onto the site via A Rafters and get the plant down.
Alternatively, you can smoke both A Rafters and A Screens and push through A Main to Site, but this is risky if the enemy has any traps set up on the choke point.
Defending A Site
On defense, it’s good to position someone in A Rafters and put traps down to deter a direct push onto the site. You’ll also typically want someone holding A Ramps, as they can fall back easily if need be.
Having a sniper positioned in A Screens can be very useful too. If the enemy smoke that area off, the sniper can reposition to watch any enemies coming through A Tower.
Attacking B site
When attacking B Site, it’s vital to either smoke off B Tower or put a wall up across the site to safely get to the planting area. Using utility to clear out B Back and the planting area is also vital, as enemies often like to hide there.
For post-plant, you can have teammates positioned in B Back and B Main as they’ll be able to hold good angles from those positions.
Defending B site
Defending B Site is best done by using a utility on the B Main choke point to stall any potential push. It’s also important to have someone watching Mid, as enemies will often smoke off Mid Vent and try to push through Mid to B Tower.
If worst comes to worst while defending B, you can always fall back and play for the retake, smoking off B Main as you try to re-secure the site.
Map Changes Since Release
To close out our Split map guide, let’s talk about some of the changes Riot has introduced to the map over the course of its lifespan.
v0.50 patch
The first major patch for Split changed a lot in an attempt to make playing on the map easier for attackers:
- Starting barrier was shifted in various locations to give attackers more of a foothold early in the round
- The wall on the left interior of B Tower was angled to remove the 50/50 angle check there
- A radianite crate on B Site was changed from penetrable to impenetrable to make planting safer for attackers
v1.00 patch
The v1.00 patch saw Mid being completely restructured, making it wider and less of a choke point for attackers.
v1.02 patch
Defender Side Spawn was slightly adjusted to make clearing angles easier for players.
v2.01 patch
Split got a major overhaul in the v2.01 patch:
- The B Main doorway was made much wider
- The B Site planting area was made slightly larger and cover was added nearby
- B Alley was made smaller to remove a few cubbies
- The entrance to Mid Vent was made wider, and a sloped wall added to the interior
- B Link was made more open
- The cubby in B Sewer was reduced in size
- The A Tower entrance from A Ramps was widened, and a sloped wall added
- Sloped walls were added on A Site